This chapter contains the following topics:
Introduction to Starting PBS, Menus and Printing
Running PBS can vary depending on your workstation/client setup and server operating system. Passport has provided flexibility in how the screens and data look so there are several variations that are possible.
This chapter will cover the most commonly used methods of starting PBS; in particular the pre-installed methods. Different font types, sizes and font characteristics are available from the standard workstation installation when starting PBS through the Windows Start menu. Thin-client workstation installations will also take advantage of these font variations.
|
Note |
The fonts settings will not affect the Graphical Mode screens. The font sizes for Graphical mode are determined by your computers Display Properties. |
If your PBS system is on a UNIX or Linux operating system and you are not using thin-client, then you can run the character-based version of PBS. The character-based version requires a terminal emulation program to run PBS on a Windows workstation.
PBS can be opened multiple times on a Windows workstation and through the concurrent usage feature. Only one use of the runtime is utilized when running PBS multiple times. The use of the concurrent usage is explained in this chapter. Also the differences between concurrent usage from PBS installed on Windows vs. UNIX and Linux is covered.
PBS has three menu types that are available. Each menu type has different features and available functions.
There are several options when running a PBS report. You can print the report to a printer, view it on screen or create an html file and view the file.
This section of the chapter is intended to assist you starting PBS.
Starting Passport Business Solutions software in a Windows environment is no different than starting most Windows applications. Navigate to the Passport Business Solutions startup on the Windows Start menu and use your mouse to activate the application.
Click
Start->Programs->Passport Business Solutions->PBS
The following are six shortcut choices for running PBS.
| • | PBS-Andale 1024 and up |
| • | PBS-Andale 800x600 |
| • | PBS-Courier 1024 and up |
| • | PBS-Courier 800x600 |
| • | PBS-Lucida 1024 and up |
| • | PBS-Lucida 800x600 |
If you are running Thin client, then -TC- will display between PBS and the font name.
|
Note |
If you are using Graphical Mode screens in version 12 and above, you must set your computer to a Windows display property higher than 800x600. The property of 1024x768 is the minimum size you should be using. However when starting PBS you may use any of the installed shortcuts. Only the character mode screens will be affected. |
The shortcut name comprises the font name and optimum Windows Display Properties Screen area for which the shortcut would work. Within each shortcut there is a setting for the font and the font size. You can choose from three fonts and two font sizes for each. The font sizes provided are the optimal for running PBS on a desktop that has been set to Display properties Screen areas of either 800x600 or 1024x768 and larger. You should select the shortcut screen area size that best suites your workstation setup. Running character mode PBS screens on a screen size smaller than 800x600 is not recommended.
|
Note |
Before you can run Passport Business Solutions the Client must be installed on your workstation. The Client install provides the start menu selections. If that has not been done you will need to see your PBS administrator. The information provided is for an out-of-the-box installation of the PBS Client. The shortcuts are modifiable. If any of the shortcuts have been modified or new ones added, then the following information may not be completely valid. See your administrator for further instructions if what you read in this chapter does not match what is installed. |
If you encounter the following message in Windows:
Warning: Year 2000 cutoff is ‘99’’ and should be changed. See Company info.
or in UNIX or Linux
Warning: Year 2000 cutoff is ‘99’’ and should be changed. Press ENTER to continue
then you must update the Year 2000 cutoff field in Company information to a more recent year. The ‘99’ represents the century number entered in Company information. This means the year 2000 cutoff is less than a year a way and needs to be changed. Our current default is 20, and will be for many years. so you can set it to that. See the Company information chapter in the PBS Administration documentation for more information on the Year 2000 cutoff field.
The thin-client startup functions essentially the same as the Windows startup.
Thin client is licensed separately.
Ensure you are logged in as a user authorized to use Passport software.
Type the following:
cd /usr/pbs
or replace “/usr/pbs” with the name of your PBS top-level directory.
Then type the following:
pbs
Then when the master menu appears, select the module you wish to use from the master menu.
Running PBS on the Server using Telnet
On some servers, the lines that make up the boxes, do not display properly. There is an option for starting PBS in UNIX/Linux that will substitute characters for the lines. To get this character substitution type the following from a command prompt:
pbs -c3
This provides the same general look as the standard startup, but provides the vertical lines, horizontal lines and corners as the pipe, dash and plus symbols respectively.
Windows concurrent usage does not apply when using Thin client.
Passport Software uses the AcuCorp™ runtime for running the PBS system. With the AcuCorp™ concurrent usage Windows runtime, you are allowed to open multiple sessions of PBS from a single workstation without reducing the total number of users who can access PBS.
You can simultaneously enter or edit data, run reports or other functions and have another PBS window open for doing other PBS work. The concurrent technology also applies if you are working in multiple companies.
To start another session of PBS, while a session is open, go to the Windows start menu and select PBS again. You will need to re-enter your user ID and password for each session.
The Windows task bar will have two (or more) PBS selections. The task bar button will display the name of the PBS function that you are accessing which makes it easy to identify and to move back and forth to each.
We highly recommend that you close each PBS window before you shut down your Windows workstation.
If you are in the middle of entering a new record it is important that you finish the record or cancel the entry before you shut down. This applies if you are running the Windows, UNIX or Linux version of PBS. Never leave a PBS record open overnight or for any extended period of time. Always exit the entry screen and go back to the menu when you have completed your entries.
Never shut down your computer in the middle of a posting.
Windows will normally detect that an application is open and try to close that application when you shut down a workstation. It is much better to log out of PBS first. When shutting down a workstation, always use the normal shutdown procedures.
If you are not using PBS for long periods, try not to leave it open when you are editing or adding a new record. Finish the entry first.
Failure to shut down PBS properly may result in a loss of data.
In Windows there are three menu types: Tree-view, Windows and Menu-bar. If you do not have thin-client, then in UNIX and Linux there is the Menu-bar type only.
All the menu types show the System Manager and various Passport Business Solutions products (modules) as selections:
|
Menu Initials |
Module name |
Type of use |
|
A/P |
Accounts Payable |
Accounting and Vendor payments |
|
A/R |
Accounts Receivable |
Accounting and Invoicing |
|
C/R |
Check Reconciliation |
Accounting |
| C/O | Customer Orders | Manufacturing |
|
CTL |
System Manager |
Controls for all modules* |
|
G/L |
General Ledger |
Accounting |
|
I/C |
Inventory Control |
Distribution and Retail |
|
I/M |
Inventory Management |
Inventory for Manufacturing |
|
J/C |
Job Cost |
Ties into Accounting |
|
M/J |
Manufacturing Jobs |
Job Tracking for Manufacturing |
|
M/S |
Master Scheduling |
Manufacturing Job Scheduling |
|
O/E |
Order Entry |
Distribution |
|
P/O |
Purchase Order |
Distribution |
|
P/R |
Payroll |
Accounting |
|
P/S |
Point of Sale |
Retail and Distribution |
|
P/D |
Product Definition |
Manufacturing |
|
P/P |
Product Purchasing |
Manufacturing Item and Parts Purchasing |
|
S/A |
Sales Analysis |
Accounting and Distribution |
|
S/F |
Shop Floor Control |
Manufacturing |
|
T/B |
Professional Time & Billing |
Professional Services Billing |
* Each selection corresponds to a single PBS product, documented by a separate documentation, except that: the System Manager (CTL) is not itself a module, but is required for any other module.
Based on what is selected in Company information, these modules will appear on the menu. It is not necessary for a module to be installed (or purchased) in order for its menu to appear on the menu. Conversely, a module may not show on the menu even if it is installed if you have been assigned a custom menu.
There are some features that are common to all menu types such as the use of the keyboard for navigating around the menu or to select the menu item. With the Tree-view or Windows menu you can also use the mouse to access a module or menu selection.
Menu Organization
The menu uses a verb/subject structure. The type of transaction is the main selection, and the application is the sub-selection. To take one example, all the reports are listed together under a single selection Reports instead of being distributed by subject.
The screen shots in the documentation display all the available menu selections. The features and functions for menu selections are described in the documentation. However, some menu selections and even some modules may not be accessible for you. There are two possible reasons for this:
| 1. | You may not be licensed for a particular module. If you feel you need this module contact your PBS provider for instructions. |
| 2. | Based on how the PBS administrator set up your menu, some menu selections or modules may have been omitted for you. This means that you have a custom menu. It has been determined, based on your specific tasks and system security, that you do not require these selections. |
The user documentation describe all the available functions for each module. If you do not have a specific menu selection, then you cannot and most likely do not need to access the function.
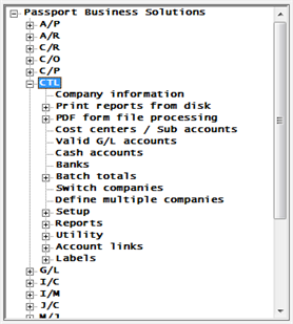
The Tree-view menu displays the menu items vertically on the left side of the main PBS screen. It is keyboard and mouse-enabled. Here is an example of the CTL (System) menu:

|
Note |
Many of the control and navigation key commands described in this section are for Windows users only. UNIX users must use the equivalent Menu-bar key strokes. |
A menu with plus sign indicates that the menu has submenus associated with it. To access a submenu, click on the plus sign or double click on the main menu line. When a sub menu is open, it is indicated so by a minus sign.
With the Tree-view menu, there are three menu levels; module, main and sub menu. The first level is the module, the main is the level under master and a sub menu is under that.
In this Tree-view CTL menu example Reports is selected:
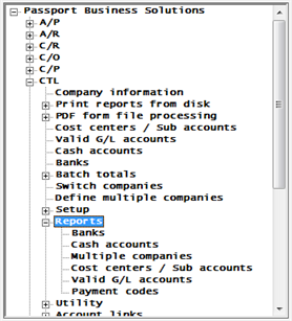
As shown on the screen above, a submenu displays immediately below the main Reports menu selection to which it refers.
Submenus also have a selection cursor. Move to a different menu selection by using the <Up> and <Down> or the arrow keys.
If you decide not to use any selection from the current submenu, click on the minus sign or hit the left arrow and the sub menu will close.
With a menu displayed, press the first letter of the selection you want. The selection cursor moves to the next selection beginning with that letter.
If more than one selection begins with the same letter, and if your cursor moves to a selection other than the one you want, press the same letter again. Repeat this action until the selection cursor is on the desired selection.
When using the Tree-view menu you have some additional shortcuts. You can use the page-up and page-down keys to move within the Tree-view menu window. Also, you can then use the home and end keys to go to the beginning or end of the menu respectively.
The Windows menu has many of the same features as the Tree-view menu. Here is an example of the Windows menu.

Like the Tree-view menu, you can access the Windows menu and PBS programs with the mouse. Clicking on module letter opens the module menu. Selections that contain sub-menus are indicated by an arrow. Moving the mouse over the main menu line causes the sub menu selection to display. Clicking on the main menu selection or sub menu selection opens the program.
You can access the menu with the keyboard using the <F10> key. Then use the right and left arrow keys to move to the module. Once at the module you can use the first letter of the menu name or the up and down arrow keys to move to the menu selection. To open a sub menu use the right arrow key. To close a sub menu use the left arrow key. To access the program use the <Enter> key.
The Windows menu has two additional selections of File and Help. Under File you can Exit PBS. Under Help you can view the PBS license information.
As you move the cursor across the top of the screen, a Menu bar menu appears which shows various selections for that particular module. This is referred to as the main menu. Menu-bar lists available modules horizontally across the top of your screen. When using the original color scheme, the alignment is further distinguished by a color which gives the appearance of a bar. The following screen shows a CTL (System Manager) menu.
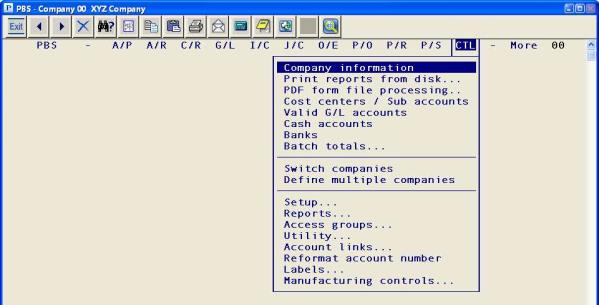
The selections are listed vertically on the Menu bar menu.
Use the Up, Down, Left and Right arrow keys to navigate around the menu.
You can use <F11>+letter key combination to move to the next module beginning with that letter.
The Menu bar menu also has a selection cursor. In this example, Company information is selected. Move the selection cursor down using the down arrow key. When the selection cursor is positioned on the desired selection, press <Enter> to activate the selection. The arrow keys change your position to a different module.
To quickly move to a menu selection, you can select the first letter of that selection and the cursor will then move to it. If more than one selection begins with the same letter, and if your cursor moves to a selection other than the one you want, press the same letter again. Repeat this action until the selection cursor is on the desired selection.
An ellipsis (…) will indicate that there is an associated submenu. To access the submenu position the selection cursor to the desired menu using the arrow keys. If you choose not to use one of the sub menu selections press <Esc> to return to the main menu. The <Esc> key always exits or quits a current selection.
The menu bar appears across the top of your screen at all times, allowing you to view which selections are available. The active selection is enclosed in vertical bars. As the Menu bar is always active, you can utilize the Access Groups and Temporary Access to gain access to other menu selections.
More may display if you are using the menu bar and is not a selection but simply an indication that more modules are installed than will fit on the menu bar. Move to this selection to view the remainder.
|
Note |
The Utility menu selection is not available from the CTL menu when running PBS via Thin-Client. |
| • | Move around the Windows and Tree-view menu with either the mouse or the keyboard. |
| • | For all three menu types you can press <Enter> to use a selection highlighted by the selection cursor. |
| • | On any of the menu types, you can move the selection cursor on menus using up or down arrow keys. For a short cut use the first letter of the menu item. |
| • | Exit the menu and return to the operating system by pressing <Esc> twice. When you have a Toolbar you can also click on the Exit button twice. |
| • | Menus may be different than what is described and displayed in the user documentation based on an administrator’s custom menu setup. |
Temporary Access and Access Groups can be used either independently or in combination. They are only available from the menu-bar style menu. If you use the Tree-view or the Windows menu, skip this section.
The B. Character Mode Advanced Features Tutorial appendix contains relevant practice exercises.
The Temporary Access feature provides a direct link between any two PBS menu selections.
Temporary access enables you to move between functions with a few keystrokes, rather than by exiting screens and working through menus and sub-menus.
You can interrupt one task, go to another function to perform a different task, and return to the place you left without any loss of data.
To use temporary access use the following control and function keys.
|
Step |
Description |
|
1 |
From your current function, press <F11> twice to open the access menu. Note: Always press <F1> to make a temporary selection. Never press <Enter>, or you will gain permanent access to your selection. |
|
2 |
Highlight the desired menu selection and press <F1>. If a sub-menu opens, highlight the desired selection from it and press <F1>. |
|
3 |
To close your temporary selection and return to the original function, press <Esc>. |
During any active selection, to interrupt what you are doing to go to a different selection, press <F11> twice. This will display the menu bar.
Move the cursor to the selection you wish to temporarily access and press <F1>.
The menu and the original active selection screen disappear and are replaced with the temporary access selection screen.
The Owner of the group is the original selection which you interrupted. The Member of the group is the temporarily accessed selection. The Member can not be the same menu selection as the Owner.
When you are finished working in the member, press <Esc>. The member’s screen disappears and control returns to the selection you interrupted with any incomplete work undisturbed. The temporary link no longer exists.
If an Access Group includes a selection which is under batch control, that selection should be the owner (rather than the member).
You should not use Temporary access to switch to another company because the Owner is not retained.
If you are in the middle of entering a transaction, you can not temporarily access posting, because you must exit the transaction entry first.
Access groups are used to link related functions. Access groups enable you to move quickly and easily between functions. Access groups will only be available when you are using the Menu bar type menu.
Building (setting up) an Access Group links up to four member selections to one owner selection. The owner is generally a major, frequently used function of a Module, such as Customers or Enter Invoices. The members are usually secondary look-up or add functions, such as tax codes or terms, that are helpful to view from the owner selection. You switch between the owner and its members using hot keys.
From the owner of an Access Group you can switch to any member, at any time. But as with temporary access, the only valid path from a member is to return to the owner of the group, and then to another member if desired.
When you switch from an owner to a member, any incomplete work in the owner is undisturbed. When you switch from a member to an owner, any incomplete work is abandoned (unless doing so would cause a data integrity problem, in which case you are asked to complete or cancel it).
Building an Access Group
From any active selection, press <F11> twice to return to the menu bar. Move your cursor to the selection you wish to activate and press <F2>.
Warning: Pressing the <Enter> key on a menu abandons the current activity and activates a new selection.
An Access Manager screen appears briefly in the center of your screen when an association is being created. The word “PBS”, normally on the menu bar (left side), is replaced by a solid, red block (reverse video on monochrome monitors). This indicates that an Access Group is now active.
If your monitor can display 25 lines (and you have so stated in Company information), a hot key bar appears on the bottom of the screen with the owner listed as #1 and the member listed as #2. Not being able to see line 25 was an issue when using older monochrome monitors and not with Windows and terminal emulation software packages.
You now have an Access Group with an owner, the original selection, and one member, the selection you activated with <F2>. Unlike temporary access, where the relationship ends when you return to the owner, this group exists for the life of the current session.
To add members to the Access Group, repeat the process described above to add up to four members for a maximum of five in the group.
Activating Access Manager
The Passport Business Solutions system provides an Access Manager so you can see information about the Access Group.
To activate the Access Manager, press <F4> at any time.
The Access Manager displays a basic menu showing the owner and member(s). To choose a selection use the <Up> or <Down> arrow, or the first letter of the selection you wish and press <Enter>. The Access Manager transfers you to that selection.
Selections appear in the same order in which you built the Access Group. The owner appears first with members listed in the order they were added to the group.
To view the Access Manager without making a selection, simply press <F4> or <Esc> to exit from the Access Manager.
Using Hot Keys
Hot keys provide the ability to switch back and forth between the owner and members of the group using the appropriate selection number. The owner is always represented by #1. The selection number is incremented by 1 for each group member in the order they are added to the group. The maximum is five.
To use a hot key, press <F11>+selection number. For example, <F11>+3 would switch control to the second member of a group and from there <F11>+1 would switch control back to the owner.
Switching Between Owner and Members
To switch from an owner to a member use one of the following:
| • | Hot key |
| • | Access Manager |
To switch from a member to an owner use one of the following:
| • | Hot key |
| • | Access Manager |
| • | <Esc> |
Operating under Batch Controls
If you are using batch controls, occasionally <F11> will not function. If this occurs, continue to the next screen and press <F11> again. You may have been in a selection that Access Manager did not control.
Combining Members from Various Module Menus
Access group members can be selected from any module menu on the menu bar. For example, if you were entering receivings through Inventory Control, Inventory (Enter) from the I/C menu is the owner, and as members you might include Items from the I/C menu, View vendor invoices from the A/P menu, and Inventory (Edit list) from the I/C menu.
<Esc> From Access Group Member
Although menu selections are not available while you are accessing a member, <Esc> is still active.
Pressing <Esc> at a sub-menu returns you to its main menu. Pressing <Esc> at the main menu exits the Passport Business Solutions and returns to the operating system.
When you press <Esc> from a main menu, all incomplete work is abandoned including the owner and member. Incomplete work which might cause a data integrity problem, however, generates a prompt for you to cancel or finish the entry.
When you make an Access Group permanent, it becomes a selection on the CTL menu and therefore, preserved from one session to the next.
Later, when you want to use that group, select it from the CTL menu as in any other menu selection.
Even though you have permanently associated the selections in the saved Access Group, each selection remains individually available from its own menu.
Saving Access Groups
After having built an Access Group, press <F4> to enter the Access Manager.
On the bottom of the Access Manager, there is a prompt: press F1 to save this Access Group.
When you press <F1>, a new screen appears showing your current Access Group and asking what name you would like to assign to it.
Press <Esc> to exit from the screen without saving the group, or enter a name to save it.
After entering the Access Group name, the Access Manager reappears, but it now displays the name you assigned to the group.
Proceed to use the group. When finished, exit as usual.
Using Saved Access Groups
Located on the CTL main menu is an Access groups selection. When you go to that selection’s sub-menu, the name of the Access Group you assigned during the save procedure appears.
Move your selection cursor to that group, and press <Enter>. The group is activated, just like any other menu selection.
Adding New Members to Saved Access Groups
Provided that your saved Access Group does not already have the maximum of four members, you can add additional members to the group on either a temporary or permanent basis.
While the group is active, press <F11> to return to the menu from the owner, move the selection cursor to the new selection and press <F2>.
The new member now belongs to the group on a temporary basis. Later, when you select the saved group again, it contains only the original members.
If you want to permanently associate the new member with the saved Access Group, delete the saved Access Group, and then re-save it with the new member.
Deleting Saved Access Groups
When there is at least one saved Access Group, the Access groups sub-menu has a note which says <F3> to delete.
Move the Access Groups sub-menu selection cursor to the Access Group you want to delete, and press <F3>. The Access Group is then no longer saved.
Changing Names of Saved Access Groups
It is possible to change the name of a saved Access Group at any time.
While the group is active, press <F4> to enter the Access Manager. With the Access Manager present, press <F1>. A screen appears enabling you to make the change.
In the course of running an application, it is frequently necessary that a report or form be generated. In Passport Business Solutions software, there are options available to enable you to control the destination of your printing. When printing, a window similar to the following will display:
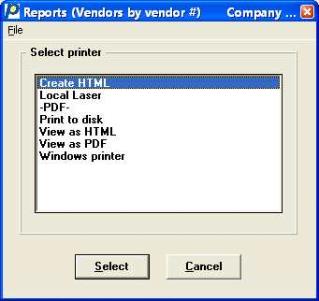
The primary options involve Company information printers, Windows printer and Display.
There are several sub-sections in this printing section:
Special Forms Usage, Alignment and Copies
You may have as many as fourteen Company information printers available (twelve in Windows and Thin client).
You can print either reports (posting or regular) or Special Forms to one of these printers, except a PDF Acrobat printer which can only be used for regular reports and certain forms. Special Forms include primarily Invoices, Checks, Purchase Orders, Statements and Labels.
If you are in Windows or Thin client then you have the option of printing reports and Special Forms to Windows printer. In character-based UNIX and Linux you do not have this option.
In some cases, the same physical printer device may be redefined under one or more different names utilizing different print characteristics in each case. For example, you may have one Company information printer setup to print to the main tray for reports on plain paper and another to print to the secondary tray where there are invoices.
The Company Information chapter in the Administration documentation describes how to name and define your printers. The names of these printers display on the printer selector window.
The print window allows you to select a printer that is installed on your workstation. In Windows and Thin client you can print both Special Forms or reports to Windows printer. The features for printing Special Forms and reports are a little different.
Using Windows printer to print Special Forms is only available in Windows and when using Thin-client on a UNIX/Linux or Windows host (network server). When you select Windows printer the Passport Windows printer selector displays. Your only choices are to select the printer or cancel the print job. When you select cancel it will bring you back to the printer selection screen.
In most cases the default font selections work very well. However, after selecting to use Windows printer, the Windows printer window displays where there are options that allow you to change the font type, font size, font, font style, page orientation, printer, page setup and more.
All windows computers have different types of fonts that can be used for writing documents and other purposes. There are two types of fonts on a system. There are ‘fixed-length’ fonts and ‘variable-length’ fonts. The length refers to the distance from the beginning of one letter to another. ‘Fixed-length’ fonts have the same distance between two letters and ‘variable-length’ fonts can vary depending on the letters used.
In PBS you can change the font when printing. The default font type and size will work in most situations. But if you change the font type you will find that the ‘fixed length’ fonts are the most workable.
On the right side of the Printing Window is the Printer layout. The lines per page and the columns per page will change depending on the font and font size chosen. If you select a font that has more than 60 lines per page and more than 135 columns per page some of the data may not print on the page.
The first time you use Windows printer after logging into PBS the printer that displays will be the workstation/client default printer. If you select a non-default printer for a report or form, the next time you print something, the non-default printer will be selected. Every time you log into PBS it will revert back to the workstation/client default printer.
If you have Thin Client or Windows version of PBS, the default printer, as determined by your workstation printer setup, or last printer selected, if you recently printed a report in PBS, will display in the Window status bar. This will revert back to the default printer every time you start PBS.
|
Note |
It Is recommended that you do not select a dot matrix type printer when printing to Windows printer. The performance may be slow and the font size may not line up properly on a Special Form. |
Special forms, as defined within Passport Business Solutions, are designed to be sent to a printer that has pre-printed forms loaded. In many cases this is a printer that is physically attached to the processing workstation, but it may also be a network printer. The processing that is implemented for Special Forms may consist of alignment functions, strict control over output to allow reprints in case of printer paper jams, and voiding functions in the case of checks.
Printing to Special Forms may be done through the use of a Company information printer (the use of a company information printer allows the printing program to directly control the printer).
Some Special Forms may also be printed using Windows Printer. When done this way, you have the option to print it with a graphical file. This is explained in the next section.
If the Company information printer is designated for Spooling the printing program will release the printer after printing the forms data to the queue so that the actual transfer to the printer itself will start right away. This will allow forms printing across a network to proceed optimally.
|
Note |
Windows printing of forms is not available for UNIX or Linux unless you are running Thin client. |
When using the Company information printers, it is recommended that you do not use Windows-only printers (non laser printer like ink-jet or multi-purpose printers) for printing Special Forms. A Windows-only type of printer will not respond to the codes needed for an alignment. Although it is possible that the printed data will align to the form as is, if an alignment change is necessary. the printing of data cannot be moved to a different location on the page and will never print in the correct page location. See the PBS Administration documentation for more information.
Printing a Special Form provides some additional options and selections depending on the form type being printed. When you are printing a Special Form, after choosing a printer:
| • | You will be warned to mount the forms in the printer before using them and to confirm that you have done so; also to confirm demounting the forms when printing is complete. |
| • | You will be given the chance to print one or more alignment form examples. See the Alignment for Special Forms section below for more information. |
| • | You are often given the option to print copies and label each copy. See the Number of Copies to Print section below for more information. |
| • | Other questions may be asked, depending on the nature of the print job, such as a starting check number, how labels are arranged on a form, and so on. As these features are not universal to the PBS system they will be explained in the appropriate chapter of the User documentation. |
Some forms such as A/P checks, statements, invoices or purchase orders vary so much from company to company that you may wish to design your own format (sometimes called a layout or a specification). Defining the specifications is a fairly complex job which is explained in a separate chapter of the corresponding User documentation.
Printing checks is best done through a Company information printer. Windows printer may work for A/P checks, but for payroll checks it is always recommended to use a Company information printer. This is because Windows printer allows a smaller print area on the page. So, the payroll check format may not fit when printing to Windows printer. If you cannot align the data to the check form using Windows printer, then you must using a Company information printer.
The data from A/P checks, A/R remittances, A/R statements, A/R invoices, O/E forms, P/O fixed and user defined forms, Point of Sale forms and various manufacturing forms may be merged with a graphical file.
The graphical file can include the lines, column names, company name and so on. These form files can be designed per your companies need. Tips for designing a graphical file is covered in the PBS Administration documentation.
There are two means of doing this merge. One is using a Windows printer and the other is using the -PDF- or -PDFP- printing setup in Company information.
Windows Printer
A Windows printer graphical file merge can be done with all the form types mentioned above.
-PDF and -PDFP-
-PDF- and -PDFP- refers to the two setups that can be entered into Company information. These setups will generate PDF files that can be viewed in Acrobat.
-PDF- or -PDFP- printing with a graphical file can be done with the same form types as above except for A/P checks, A/P remittances and PR checks.
The -PDF- setup will allow you to create a PDF file and later view the file. In some cases you may immediately view the file. The -PDFP- setup allows you to create a PDF file and print the document at the same time.
These features are available in all operating system environments. The PDF form files are saved in a special directory on your system. These locations are documented in the corresponding user documentation.
In Windows or Thin client, forms that were generated as PDF files may be emailed or viewed from the CTL menu selection PDF form file processing. For more information see the PDF Form File Processing chapter.
An alignment lets you align the paper to the printout, either by adjusting your printer to fit Passport Business Solutions’s printout; or (in the case of laser printers) by nudging the printed output to fit your printer.
Form alignments for Company information printers and Windows Printer are similar but they do have some differences.
Windows printer alignment is relative the upper left corner of the page; 0.0 by 0.0 is the upper left corner, based on what the printer driver allows.
For most forms the Company information printer alignment 0.0 by 0.0 is the upper left corner of the printable area on the screen. However in some cases the PBS forms printing program such as labels programs determine a slightly different location on the page.
Company information printing allows both negative and positive number adjustments. Windows printing only allows positive adjustments because it starts, by default, in the top-left corner of the page based on what the printer allows. For Windows printer alignment you must enter an adjustment number greater than the default margin in order for an adjustment to take effect. In Windows when you increase the top adjustment you will likely decrease the amount of lines you can print on the page.
When merging with a graphical form image file, the adjustment only effects the data and not the form image file. The way to modify the form image file is to use a program that can edit Jpeg (.jpg) or Bitmap (.bmp) file types. See your system administrator or graphics designer for help with this.
The number of copies screen only displays if printing to a Company information laser printer or Windows printer.
For many forms you have the option to print up to 9 copies with a different printed label for each copy. Each label can be up to 25 characters long.
For the forms that are "programmed" and not user definable, a label will print automatically for each copy when entered. For other forms, in order for the label to print on the form, you must have the field assigned to the form. As forms design is not universal to the PBS system it will be explained in the appropriate chapter of the User documentation.
Employee, vendor and customer label printing has many similarities and some differences. The laser margins and label size fields are universal and are documented here:
Top margin
Enter the top margin. It is the distance from the top edge of the carrier page to the first row of label printing.
Left margin
Enter the left margin. It is the distance from the left edge of the page to the first column of label printing.
Label size
For a laser printer, you may use any one of the following label sizes:
| Selection | Description |
|---|---|
|
1 |
4 inches wide by 1 inch high (20 per page) |
|
2 |
4 inches wide by 1-1/3 inches high (14 per page) |
|
3 |
4 inches wide by 1-1/2 inches high (14 per page) |
OK or Cancel
Select OK to continue or Cancel to not print the labels.
Passport Business Solutions for Windows provides the capability of printing PBS reports directly to Windows printers that are installed on your computer or workstation and to printers as defined in Company information.
When you print a standard report, the Passport Printer Selection screen will display and you will have the option of selecting Windows printer, Print to disk, Display on screen, Create HTML or any one of the printers you have defined in Company information. When you print a report, in character mode you will access a screen similar to the following:
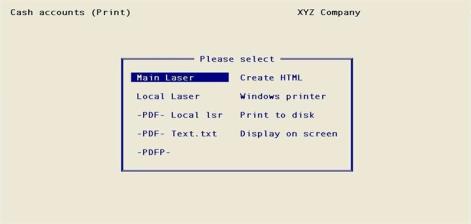
The available options are:
|
Option |
Description |
|
[Printer name] |
This option represents one or more real printers as defined in Company information. How many of these appear on your screen, and what their names are, depend on the company setup.
In the example above these printers are Main laser, and Local Laser.
When a printer name contains -PDF- as part of the name, then it will display the report in either Adobe Reader or Adobe Acrobat if either program is installed on your workstation. If neither program is installed, the PDF file will still be created, but it will not display on the screen. In UNIX or Linux the file is created but it will not display. A -PDFP- printer is for generating and printing forms at the same time. Do not select a -PDFP- printer for viewing a report.
Forms such as A/R Invoices, Statements, O/E Invoices, Purchase Orders, Point of Sale, Manufacturing and their respective alignments can also be created as a Acrobat PDF file. These files are stored in special directories under the main PBS directory. See the associated user documentation for more information. This feature applies to Windows, UNIX and Linux installations. However, a PDF file may only be attached to an email when using Windows. See PDF Form File Processing for more information. |
|
Print to disk |
This is a virtual printer. It stores the report on disk for later printing or viewing. See the chapter Printing Reports from Disk for more information on this feature. Also see the Save registers below. |
|
Windows printer |
Sends a print job to the Windows print spooler. This option is available for printing reports and sometimes for Special Forms. |
|
Display on screen |
This is another virtual printer, and directs the report to the screen. It is available when printing reports only.
On Windows and Thin client systems you have up to three display options. You can display in HTML, PDF or on a Character screen (if using character mode only). |
|
Create html |
Automatically generates an html document that can be viewed on screen, emailed or saved for later use. This option is available for reports and statements only. |
Each of these printer options is described in more detail later in this chapter.
Select the desired real or virtual printer by typing the first character of the option or by pressing the arrow keys. Then press <Enter> to print. In Windows you can right click to select the printer.
If you are set up for using the graphical version of PBS, then you printer selection will look something like this:
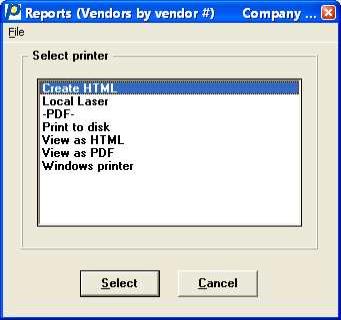
To stop a report at any time while it is printing, press <F1>. Press <F1> again to resume printing, or press <Esc> to cancel the report.
A unique number is automatically assigned to each report as it is printed to assist you in report tracking.
Only select -PDF- for viewing a report or edit list in Acrobat. Do not select -PDFP- as the data will not display in Acrobat.
Do NOT select -PDFP- or -PDF- for printing a posting report or journal.
There are several types of reports. These include standard reports. accounting register reports (also known as posting or audit trail reports) and printouts of purged data.
They function in a similar manner, but with accounting register reports you do not have the options of Display on Screen and Create HTML. Accounting register reports have been restricted to a Company information printer, Windows printer or Print to disk.
Accounting register reports may be critical to your business or are required by law to be available. You must print these on paper (as opposed to viewing them on the screen). In most cases, you can obtain a printed copy of the information before committing yourself to producing this critical report for instance, you can print out an edit list before you print out a register.
You are not prevented from spooling an accounting register report to disk, but once it is there you cannot delete it until it has been printed at least once. You have the option (in Company information) of storing such reports on disk simultaneously with printing them on a real printer. This ensures that a backup is available should the hard copy be accidentally lost.
Do NOT select -PDFP- or -PDF- for printing a posting report or journal.
Printing to disk has the following advantages:
| • | You can return to your work sooner because virtual printers are faster than real ones. |
| • | You can smooth out the workload for your printers by postponing less essential reports to slack periods of the day. |
| • | You can review the report before deciding whether it merits being printed. You do not have to print all the pages but only those you need. |
Considerations:
| • | You have to find, print or view the report later to review the data rather than doing it now and finishing the job. |
| • | This applies to character mode only. You cannot print a standard report to HTML if it has been printed to disk. However, if your system is set up with a -PDF- printer, you can generate a file with that function which provides an easy way to view the data. |
Whether or not you have elected to Save registers in Company information the following applies:
| • | Save Registers means that a duplicate copy of a register (a report created whenever posting occurs) is saved to disk whenever you send the register to a physical printer at the time of original creation. This is a safety feature in case the hard copy is lost. |
You can purge saved registers at any time using Purge saved registers, located on the menu under Print reports from disk.
If you directed the register to disk upon original creation, it makes no difference whether your answer here is Y or N. Only one copy is stored, which must still be printed at least once before it can be removed from disk (by the Delete reports selection, not the Purge saved registers selection).
| • | A response of N still allows you to direct a register to disk or to a printer but not both. If you send it to the disk, you cannot delete it until you have physically printed it from disk at least once. |
See the Company information chapter in the PBS Administration documentation for setting the Save registers field.
See the Printing Reports from Disk chapter in this documentation for information on how to view and print reports once they have been spooled to disk.
This feature is not available for certain reports since their nature must be printed on Special Forms (checks, invoices, etc.), nor is it available for critical reports like registers which must be printed to paper or at least printed to disk to preserve the audit trail.
To display a report, select Display on screen.
In UNIX or Linux the screen will start displaying in the default character type and there are no other options. In Windows and Thin client you will be presented with these options:
|
P or View as PDF |
The P=PDF selection allows you to view the report in Acrobat Reader and Adobe Acrobat. This option is only available in Windows and Thin client. |
|
C |
The C=Character option allows you to view the report on screen and use various keys to navigate around the report. Only available in Character mode. |
|
Create HTML or View as HTML |
The H=HTML allows you to display the report on screen, but you are looking at the report in the HTML viewer. It is only available in Windows or Thin client.
Some browser versions have a limitation with the maximum html file size. If you know your report is very long, you may want to choose PDF which has no limitation. |
|
N |
The N=Select another printer option allows you to select a different printer so you do not have to display the report on screen. This is only available in character mode using UNIX or Linux. |
P = PDF or View as PDF
To use this function either Adobe Acrobat or the Acrobat Reader must be installed on your system. See your system administrator if you need a program installed.
Selecting PDF creates a PDF file on the system and invokes the Adobe™ Acrobat™ or Acrobat Reader which displays the report. Depending on the system setup, you may be able to save the report in another location. If neither of these applications are installed on your workstation, the PDF file will be created, but you will have no way of opening the file.
Below is the Cash Accounts report displayed on screen via PDF in Acrobat:
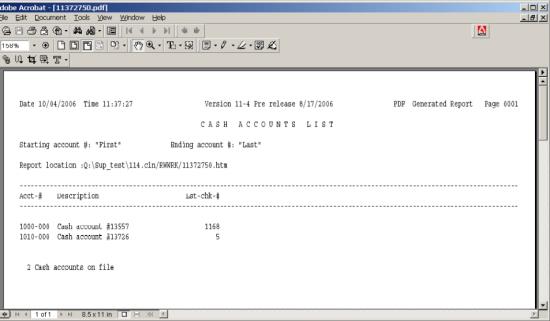
The features available in Acrobat depend on the version of Acrobat that is installed on your system. If you need more information refer to the help provided with the application.
C=Character
This option is not available in the graphical version of PBS.
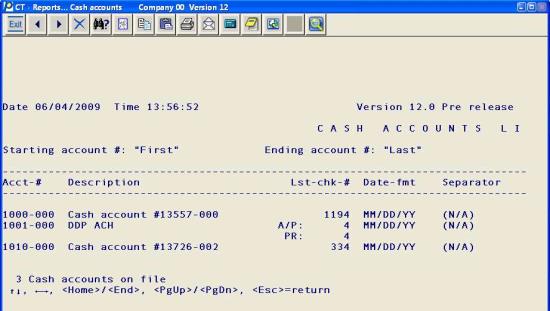
When you select Character a screen similar to the following appears. The bottom line is the area of interest for this explanation.
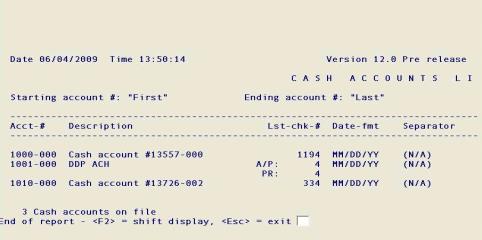
Press <F1> at any time to pause the scrolling of the report. The following options are available:
|
Option |
Description |
|
<F1> |
Stop/Continue |
|
<F2> |
Shift/Scroll Display |
|
<Esc> |
Cancel/Return |
After you press <F1>, the <F2> prompt changes from shift display to scroll display. When you press <F2>, the bottom line changes as shown below:
|
Left and Right arrow |
Shifts the display to the right or left. |
|
Up and Down arrow |
Shifts the display up or down one line. |
When you stop the scrolling before the report is at the end, you can only page down to what has already been displayed.
|
<Home> and <End> |
Positions the display to the beginning or the end of the current report. |
|
<PgUp> and <PgDn> |
Positions the display to the previous or next screen of information. |
H=HTML or View as HTML
This option is only available if you are using PBS in Windows or via Thin client.
When you select HTML the report automatically is written as a temporary file and the HTML viewer displays the report in the PBS web browser. Here is an example of the cash accounts report in HTML.
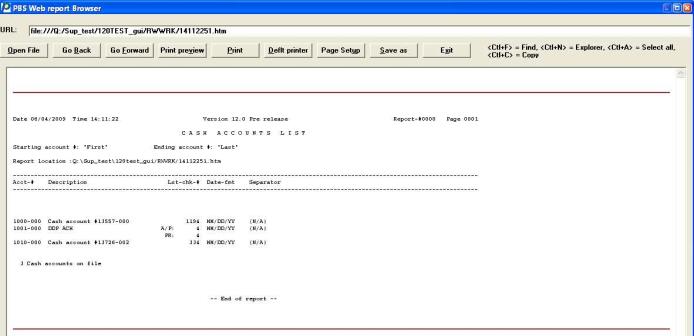
When selecting to print to html, it is actually displaying the report with the help of your default browser. Some browser versions have a limitation with the maximum html file size. If you know your report is very long, you may want to choose PDF which has no limitation.
These buttons are available:
| Button | Description |
|---|---|
| Open file | Select this option to open a file. You may select a file type of either HTM, PDF, CSV, xls, or avi. |
| Go back | Go back to a previous screen |
| Go forward | Go forward to a previous screen |
| Print preview | View the file with Microsoft's html page viewer. It is recommended that you have Internet Explorer 7 or greater for this feature. |
| Allows you to first select a printer and then print the page. | |
| Deflt printer | This will print the page automatically to the printer |
| Page Setup | Allows you to change things like Orientation, Margins, page size and source. In most cases the default settings are best. |
| Save as | Allows you to save a copy of the displayed page. |
| Exit | To exit the display. |
The browser also provides several keyboard options:
|
Option |
Description |
|
<Ctl+P> |
This will display a Print window where you can select the printer where you want the report to go. |
|
<Ctl+F> |
= Find This displays the Find window that you can use to search for information in the report. |
|
<Ctl+N> |
= Explorer This will launch Internet Explorer, or other default web browser, and display the report in the browser. From here you can use the other features of your default browser. |
|
<Ctl+A> |
= Select all This will select the entire contents of the report. You can then copy and paste the contents to another application. |
|
<Ctl+C> |
= Copy Any portion of the report that has been selected can be copied to RAM memory from which you can paste it to another application. |
|
URL: |
This is a field where you can type in a web address or the path and name of saved file. As an example type “pass-port.com” to view Passport’s web site. |
This features is only available in Windows and Thin client.
Create HTML provides two functions. It is another way to view the report on the screen and it also asks you to save the report to a file name and location of your choice.
To print a report using this feature select Create HTML. First the Report file Save As window like this will display.

In this window you have the following options.
|
Option |
Description |
|
File name |
In the File name field enter the name of the report. The report can be any name you choose, but it should be something you will recognize later if you want to select and view the report again. |
|
Save as |
A default location for saving the report is provided. Optionally you can choose another location in the Save in field. |
|
Save in |
Once you have given the report a name, you can click on the Save button or select the <Enter> key. |
|
Cancel |
You can select the Cancel button or click on the ‘x’ if you do not want to Create and View an HTML file. |
Once you have selected Save, then the PBS Web Report Browser will launch with the HTML report displayed in the browser.
Many of the browser view options are the same as Display HTML. These are covered in the previous section.
The PBS Web Report Browser is directly linked to your workstation default Web Browser which shares many of its features.
Some reports and forms have an option for a CSV file output. A CSV, Comma-delimited, file can be opened in spreadsheet applications like Microsoft Excel.
Examples of a CSV file output include A/P Purchase journal, A/R Aging, A/R Sales journal, G/L Financial statements, G/L Trial balance, G/L Extract financial data and most S/A reports.
You have an option to print most PBS screens. Printing the information displayed on a screen may be useful for many reasons all of which we will not go into here.
The Print Screen function will print both the field names and field data, when present. In can be used when viewing a master file record, transaction record, report selections and reports printed to screen. It will only print the data that is displaying on the screen at that time.
The PBS file, initialization and other external utilities are excluded from the print screen function.
A printer selector window displays when printing a screen. From this window you can select your printer of choice. There are two methods of accessing the Printer window. You can either click on the PBS Toolbar printer button or select the <Ctrl+P> on the keyboard.
You can use the default font if you like. With DeskJet and LaserJet printers the default printer font works fine, but selecting the Courier 12 font fills the page width.
If you are using Thin-client you have all the same options as the Windows print screen.
If you are using the character-based UNIX/Linux PBS version you can also print the screen but you can only print to the first printer as set up in Company information. To print the screen select the <Sft+F10> keys.
In many respects, Passport Business Solutions applications operate similarly. Any exception to the following sequence is stated in the user and administrative documentation.
| 1. | Start Passport Business Solutions. |
| 2. | Select the module from the main menu. You can use the arrow keys or the mouse to select the module. In our example the Accounts Receivable (A/R) module is selected. |
| 3. | To select Miscellaneous charges from the A/R menu, type M, click on the plus next to Miscellaneous charges or double click on the words Miscellaneous charges. In this case, another submenu displays. |
| 4. | Click on the word Enter and the Miscellaneous charges screen displays. If using batch controls, then you must first select a batch. |
| 5. | Enter any new or edit existing miscellaneous charges from the screen generated by step 4. |
This section only applies when using character mode.
An asterisk (*) appears next to field(s) used to identify specific records such as each customer or each invoice. For example, each customer in A/R is identified by a customer number. Each miscellaneous charge in A/R is identified by a unique combination of three fields: customer number, document number and document type.
Fields identified by an asterisk cannot be changed after a new entry has been added to the file (completed). This is because the field is a unique key and is used for a software function, such as an inquiry or a sort. If a field marked with an asterisk is incorrect, delete the existing entry and reenter the field with the correct information.
Entry of fields on a screen is complete once you press <Enter> at Field number to change ?
|
Note |
Some forms, such as Customers, Items or Employees, have multiple screens per form. Entry of fields on a form is complete once you press <Enter> at Field number to change? on the last screen of the form. |
Prompts (messages) usually appear at the bottom of the screen or in a pop-up prompt window showing various options.
When using the Windows version function key prompts are also mouse-enabled. You can click anywhere on the prompt and it will act like a button. Also, some of the functions have equivalents on the Toolbar. The Toolbar functions are covered later in this documentation.
The user documentation list available options in the following format:
|
Options |
Descriptions |
|
<F1> |
For the next entry. |
|
<SF1> |
For the previous entry. |
|
<F2> |
For the next customer. |
|
<SF2> |
For the previous customer. |
|
<Blank> |
To look up by name. |
Follow these steps to enter new file information:
|
Step |
Description |
|
1 |
In graphical mode, select the New button.
In graphical and character type the appropriate information in the fields as described in the appropriate user documentation. |
|
2 |
Use <Shift+Tab> (<Up> in character mode) to go back to previous fields to change any information you just entered. Use <Down> or <Enter> to accept a default shown in a field or to skip a field in which you are not required to supply information. |
|
3 |
In character mode, after you enter all information on the screen, Field number to change ? appears. Make any changes by entering the number of the field you want to change. The cursor moves to that field and you may then change the information. When you are finished, press <Enter> at Field number to change ? to write the transaction to the file.
In Windows when using character mode, you may also use the mouse to click on a field to change it. You must click on an area to the right of the field number.
On graphical screens there is no Field number to change field. You can simply click on any field using the mouse that you want to change. |
|
4 |
Using character mode, <Esc> has several meanings. If <Esc> is pressed at a field from other than the first field, it allows you to abandon the data you do not desire to keep. If <Esc> is pressed at the first field of a screen, you will exit normally to the previous menu. Other uses of <Esc> are shown in prompts.
In graphical you can select the Cancel button or the Exit button. |
Using graphical mode, select the Edit button to have access to an existing record. You may now click on any field you want to edit or use the arrow key to get to the field.
Follow these steps to enter existing field entries in character mode:
|
Step |
Description |
|
1 |
Select existing data for any field either by typing the correct information in the field(s) identifying it (fields with asterisks) or by following screen instructions. For example, pressing <F1> for the next customer until you reach the desired customer. |
|
2 |
The selected entry appears. You are prompted with Field number to change ?. You can change any field except those marked with an asterisk. You can delete an entry by pressing <F3> (if the <F3> to delete option appears). |
|
3 |
Once the screen clears in response to pressing <Enter> at Field number to change ?, either make another entry, or press <Esc> to exit. If you press <Esc>, the screen returns to the main menu. In many instances, you are prompted to confirm canceling an entry by pressing <Enter>. |
|
4 |
If you press <Esc> again from the higher menu, the next higher menu reappears. For example, if you press <Esc> from miscellaneous charges, the A/R menu reappears. |
The System Manager selections are described in a separate chapters later in this documentation. The Company information and Setup selections, except for Payment codes, are described in the PBS Administrator documentation.
Select
CTL. The menu is:
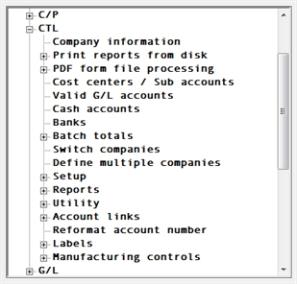
Some selections appear on this menu only if they have been authorized in Company information. Also, if you are a general user you may be assigned a custom menu which causes some menu selections to not be available.
Access groups will only appear on the menu if you are using the Menu-bar menu type.
Utility will not display if you are running PBS via Thin client.